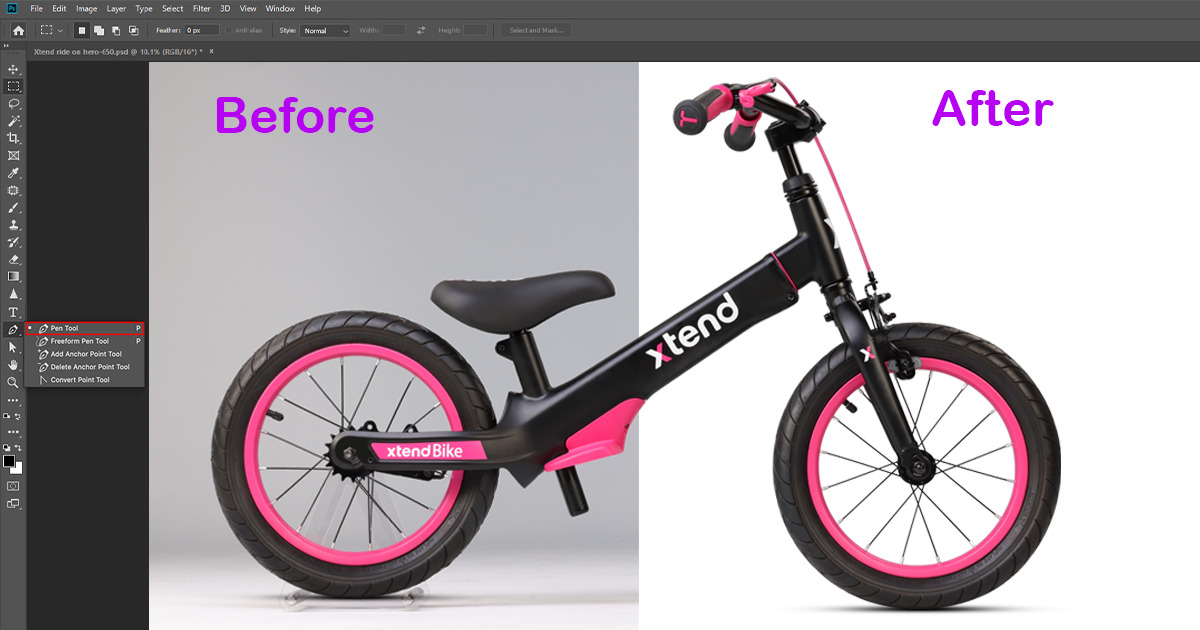
Introduction:
Are you tired of product photos that lack depth and impact? Do you want to make your products stand out and captivate your audience? Look no further! In this beginner’s guide, we will show you how to create amazing product photos with drop shadows in Photoshop.
Imagine this: You have an online store, and you’ve put in all the hard work to source the perfect products. But when it comes to showcasing them, your photos fall flat. They lack that professional touch that makes customers take notice and feel compelled to buy. That’s where drop shadows come in.
In this comprehensive guide, we’ll explore the power of drop shadows and how they can transform your product photos from ordinary to extraordinary. We’ll cover everything from what drop shadows are and why they are important, to step-by-step instructions on how to create them in Photoshop.
Understanding Drop Shadows in Photoshop
When it comes to creating amazing product photos, one important technique to master in Photoshop is adding drop shadows. A drop shadow is a visual effect that gives your product image depth and dimension, making it appear as if it’s casting a shadow on the background. Understanding how to use drop shadows effectively can greatly enhance the visual appeal of your product photos.
I. What is a Drop Shadow?
A drop shadow is a realistic shadow that is created to mimic the effect of an object being illuminated by a light source. It helps to separate the product from the background, giving it a more professional and polished look. This effect is achieved by blending a shadow layer with the background layer, creating a sense of depth.
II. Types of Shadows
There are different types of shadows you can apply to your product photos depending on the desired effect. Some common types include:
1. Natural Drop Shadow: This type of shadow closely resembles the shadow that an object would naturally cast onto a surface, giving your product a more realistic appearance.
2. Soft Drop Shadow: A soft shadow has gentle edges, creating a subtle, less-defined effect. It is suitable for products with softer edges or for creating a more subtle shadow effect.
3. Hard Drop Shadow: A hard shadow has sharp edges, creating a more defined and dramatic effect. It is often used to give products a more striking and noticeable shadow.
III. Adding a Drop Shadow in Photoshop
To add a drop shadow to your product image in Photoshop, follow these steps:
1. Open your product photo in Photoshop.
2. Create a duplicate layer of the background layer by dragging it onto the “New Layer” icon in the Layers panel.
3. With the duplicated layer selected, go to the main menu and click on “Layer” > “Layer Style” > “Drop Shadow.”
4. A dialog box will appear with various drop shadow settings. Adjust the angle, distance, size, and opacity of the shadow to achieve the desired effect.
5. You can further refine the shadow by adjusting the settings for blending mode, spread, and noise.
6. To make the shadow more realistic, you can apply a Gaussian Blur by going to “Filter” > “Blur” > “Gaussian Blur” and adjusting the pixel radius.
7. Make sure to mask out any areas where the shadow should not be visible by adding a layer mask to the shadow layer.
8. Finally, save your transformed image with the drop shadow effect
Importance of Drop Shadows in Product Photography
When it comes to product photography, drop shadows play a crucial role in enhancing the overall appearance of your images. By adding a realistic shadow under your product, you can create a sense of depth and make it stand out from the background. Here’s why drop shadows are essential in product photography:
1. Creating a Three-Dimensional Look: Drop shadows give your product a three-dimensional effect, making it appear more lifelike and tangible. This is particularly important when showcasing products online, as it helps potential customers visualize the item better, increasing the chances of making a purchase.
2. Separating the Product from the Background: When shooting product photos on a white background, drop shadows serve as a visual separator between the product and the background. This separation adds clarity and prevents the product from appearing flat or blending into the background, ensuring that every detail is easily discernible.
3. Adding a Professional Touch: Including drop shadows in your product photos can elevate the overall quality and professionalism of your images. Customers tend to associate well-presented and visually appealing product images with trustworthiness and reliability. By incorporating drop shadows, you demonstrate attention to detail and make your products look more polished.
4. Emphasizing the Main Subject: Drop shadows allow you to emphasize the main subject of the photo by drawing attention to it. With carefully placed shadows, you can highlight specific features or aspects of the product, directing the viewer’s gaze to the intended focal point.
In order to achieve the perfect drop shadow for your product photos, it is essential to understand the technical aspects of creating them in Photoshop. Mastering the use of the blend mode, layers panel, and transform tool will allow you to generate a natural shadow that complements your product.
Getting Started with Photoshop: Background Layer and Layers Panel
When it comes to creating amazing product photos with drop shadows in Photoshop, understanding the basics is essential. In this section, we will guide you through getting started with Photoshop and familiarize you with the background layer and the layers panel.
1. Open Photoshop and Import Your Product Image
To begin, launch Adobe Photoshop and import your product image by going to File > Open. Select the image file you want to work with and click “Open” to import it into Photoshop.
2. Set a White Background
To create a clean and professional look for your product photo, it’s essential to have a white background. Ensure that your image is on a separate layer and double-click the layer to open the Layer Style dialog box. In the dialog box, select “Blend Mode” and choose “Normal.” Then, click on the “Opacity” slider and reduce the opacity to make the background transparent. Finally, create a new layer below the product image layer and fill it with white by selecting Edit > Fill, and choosing white from the drop-down menu.
3. Understanding the Layers Panel
The layers panel is where you’ll find all the layers of your Photoshop document. It allows you to work with individual layers to make precise edits. To open the layers panel, go to Window > Layers. Once opened, you’ll see your product image on a separate layer above the white background layer.
4. Organize Layers with Renaming and Grouping
To stay organized and make your workflow smoother, rename your layers accordingly. Simply double-click on a layer’s name in the layers panel and give it a descriptive name like “Product Image” or “White Background.” You can also group layers by selecting multiple layers and pressing Ctrl+G (Windows) or Command+G (Mac). This will create a folder in the layers panel where you can keep related layers together.
5. Adjusting Layer Opacity and Visibility
The opacity of each layer determines its transparency. By adjusting the opacity, you can blend layers together or create subtle effects. To change the opacity, select a layer in the layers panel and use the opacity slider at the top. You can also toggle the visibility of a layer on and off by clicking the eye icon next to the layer’s name.
Adding a Drop Shadow to the Product Image
When it comes to product photography, adding a drop shadow can make a significant difference in enhancing the overall appearance and professionalism of your images. A drop shadow adds depth and dimension, making the product stand out against the background. In this section, we will explore the step-by-step process of adding a drop shadow to your product image using Adobe Photoshop.
1. Open the image in Adobe Photoshop:
Launch Adobe Photoshop and open the image you want to work on.
Make sure your image has a white background or a background that contrasts well with the product.
2. Create a new layer for the drop shadow:
In the Layers panel, click on the “New Layer” icon at the bottom.
Name the layer as “Shadow” or any other name you prefer.
3. Apply the drop shadow effect:
With the new “Shadow” layer selected, go to the main menu and choose “Layer” > “Layer Style” > “Drop Shadow”.
This will open the Layer Style dialog box with various options to customize your drop shadow.
4. Adjust the drop shadow settings:
In the Layer Style dialog box, you can tweak the settings to achieve the desired shadow effect.
Play around with the Opacity, Angle, Distance, Spread, and Size sliders to control the appearance of the shadow.
Preview the changes in real time to see how they affect your product image.
5. Fine-tune the shadow using the Transform tool:
If needed, you can use the Transform tool to adjust the shape, size, and position of the drop shadow layer to match the perspective and lighting conditions of the image.
Select the “Shadow” layer and choose Edit > Transform > Perspective, Scale, or any other transformation option that suits your requirements.
6. Refine the shadow:
To make the shadow look more realistic, you can apply some additional adjustments.
Select the “Shadow” layer and go to Filter > Blur > Gaussian Blur.
In the Gaussian Blur dialog box, adjust the Pixel Radius to soften the edges of the shadow and create a more natural appearance.
7. Use a layer mask for precise control:
If you want to hide or reveal specific areas of the shadow, you can add a layer mask to the “Shadow” layer.
Select the layer and click on the “Add Layer Mask” icon at
Customizing the Drop Shadow with Blend Mode and Transform Tool
Once you’ve added a drop shadow to your product photo, you can further customize its appearance using the Blend Mode and Transform Tool in Adobe Photoshop. These tools allow you to adjust the intensity, direction, and perspective of the shadow, creating a more realistic and visually appealing effect for your product images.
I. Adjusting the Blend Mode
To enhance the drop shadow and make it blend seamlessly with your product photo, you can experiment with different Blend Modes. Here’s how:
1. Select the shadow layer in the Layers Panel.
2. Locate the Blend Mode dropdown menu in the top left corner of the Layers Panel.
3. Click on the dropdown menu and choose a Blend Mode that best suits your desired effect. Some commonly used Blend Modes for drop shadows include Multiply, Overlay, and Soft Light.
Using different Blend Modes can change the shadow’s opacity, color, and overall appearance. Play around with the options until you achieve the desired result for your product image.
II. Adjusting the Transform Tool
The Transform Tool in Photoshop allows you to make adjustments to the size, angle, and position of the drop shadow. Follow these steps to customize the shadow further:
1. Select the shadow layer in the Layers Panel.
2. Go to the main menu and choose Edit > Transform > Scale/Rotate/Skew.
3. Click on any of the transformation handles around the shadow.
4. Drag the handles to resize or rotate the shadow as needed.
By using the Transform Tool, you can make the drop shadow larger or smaller, change its perspective, and even adjust the angle to simulate different light sources. This level of customization helps create a more natural and convincing shadow effect for your product photos.
Enhancing the Realism: Gaussian Blur and Layer Mask
To truly enhance the realism of your drop shadow effect, there are a few more steps you can take using Gaussian Blur and Layer Mask in Photoshop. These techniques will add depth and dimension to your product photos, making them appear more natural and professional.
1. Apply Gaussian Blur to the Shadow Layer:
Once you have created your shadow layer by duplicating the product image layer, it’s time to give it a realistic softness using Gaussian Blur. Follow these steps:
a. With the shadow layer selected, go to the main menu and click on Filter.
b. From the drop-down menu, select Blur, and then choose Gaussian Blur.
c. In the Gaussian Blur dialog box, adjust the pixel radius to achieve the desired level of softness. Be careful not to overdo it, as it may result in an unrealistic shadow.
d. Click OK to apply the Gaussian blur effect to your shadow layer.
2. Create a Layer Mask for Precise Shadow Placement:
To precisely position and refine the drop shadow, you can use a layer mask. This allows you to hide or reveal specific areas of the shadow layer. Here’s how you can do it:
a. With the shadow layer selected, click on the “Add Layer Mask” button at the bottom of the Layers panel. This will add a layer mask to your shadow layer.
b. Ensure that the layer mask thumbnail is selected (it should have a white highlight border around it).
c. Use the Brush Tool (B) with a soft brush and black as the foreground color. Paint over areas of the layer mask where you want the shadow to be hidden or softened.
d. If you make a mistake, you can switch your brush color to white and paint over the mask to reveal the shadow again.
e. Experiment with different brush sizes and opacities to achieve the desired effect. Remember, subtlety is key for achieving a natural-looking shadow.
3. Adjust the Shadow Opacity and Blend Mode:
Fine-tuning the opacity and blend mode of your shadow layer is crucial to achieving a realistic drop shadow effect. Here’s what you need to do:
a. With the shadow layer selected, locate the Opacity setting in the Layers panel.
b. Decrease the opacity to achieve a more subtle shadow effect, or increase it for a stronger drop shadow.
c. Additionally, try
Fine-Tuning the Drop Shadow with Opacity and Gradient Tool
Once you have added a drop shadow to your product image in Photoshop, it’s time to fine-tune the effect to achieve the desired result. This section will guide you through the process of adjusting the opacity of the shadow and using the gradient tool for more customization.
1. Adjusting the Opacity of the Drop Shadow:
Select the layer that contains the drop shadow in the layers panel.
Locate the “Opacity” slider in the layers panel and drag it to increase or decrease the opacity of the shadow. A higher opacity will make the shadow more prominent, while a lower opacity will make it more subtle.
Keep experimenting with different opacity values until you find the perfect balance for your product image.
2. Using the Gradient Tool for a Smooth Transition:
Select the layer that contains the drop shadow in the layers panel.
Choose the gradient tool from the toolbar.
In the tool options bar at the top, click on the gradient thumbnail to open the gradient editor.
Customize the gradient by adding or removing color stops, adjusting their positions, and changing the colors to create a smooth transition from the shadow to the product image.
Experiment with different gradients to achieve the desired effect.
Apply the gradient by clicking and dragging the tool across the drop shadow area. You can adjust the angle and length of the gradient by dragging the tool in different directions.
Quote: “By adjusting the opacity and using the gradient tool, you can add depth and dimension to your drop shadow, making it look more realistic and professional.”
3. Fine-Tuning Tips:
To further enhance the realism of the drop shadow, consider adjusting the angle of the shadow to match the incoming light source in your product image. This can be done by selecting the drop shadow layer, going to the “Layer” menu, choosing “Layer Style”, and then selecting “Drop Shadow” from the drop-down menu. In the dialog box, you can adjust the angle to create a more accurate representation of the shadow.
Don’t forget to save your work regularly to avoid losing any changes you’ve made to your drop shadow.
Quote: “With a little experimentation and attention to detail, you can create a drop shadow that perfectly complements your product image, giving it a professional and polished look.”
Advanced Techniques: Using Alpha Channel and Filters
In order to take your drop shadow effects to the next level and create even more realistic product photos, you can utilize alpha channels and filters in Adobe Photoshop. These advanced techniques allow for greater control over the appearance of your shadows and give you the flexibility to achieve desired results.
1. Creating an Alpha Channel:
Open your product image in Photoshop and make sure you have the Layers panel visible.
Duplicate the background layer by dragging it onto the “New Layer” button at the bottom of the Layers panel.
With the duplicated layer selected, click on the “Add Layer Mask” button at the bottom of the Layers panel to add a layer mask.
Select the layer mask (the white thumbnail adjacent to the duplicated layer’s thumbnail) and use the Gradient Tool to create a soft fade or feather effect on the edges of the layer mask.
Adjust the opacity of the duplicated layer to blend the drop shadow more naturally with the white background.
2. Applying Filters for a more pronounced shadow effect:
With the duplicated layer still selected, go to the main menu and choose “Filter” > “Blur” > “Gaussian Blur”.
In the dialog box that appears, adjust the pixel radius to define the level of blur for the shadow. This will contribute to a more realistic shadow appearance.
Experiment with different blur radii to achieve your desired effect. Remember to keep in mind the distance and intensity of the light source in your product photo to maintain realism.
3. Refining the Shadow:
Once you have applied the Gaussian Blur filter, you can further adjust the shadow’s appearance using the Transform tool.
Select the transformed image layer and go to “Edit” > “Transform” > “Scale” to resize the shadow as needed.
To change the angle of the shadow, go to “Edit” > “Transform” > “Rotate” and rotate the shadow accordingly.
Use the Move tool to reposition the shadow to match the incoming light source in your product photo.
These advanced techniques utilizing alpha channels and filters give you more control and precision over the appearance of your drop shadows. By refining the shadow’s opacity, softness, and shape, you can create a perfect shadow that enhances your product image and adds depth.
Troubleshooting Common Issues with Drop Shadows
While creating drop shadows in Photoshop for your product photos can greatly enhance their visual appeal, it is not uncommon to encounter a few issues along the way. Let’s explore some common problems that may arise and how to troubleshoot them effectively.
1. Uneven or Unnatural Shadows:
If you notice that your drop shadows appear uneven or unnatural, it could be due to improper placement or angle adjustment. Make sure to position your light source accordingly to create a realistic shadow. Experiment with different angles until you achieve the desired effect. Additionally, consider adjusting the opacity and size of the shadow layer to further enhance its natural look.
2. Blurry or Pixelated Shadows:
Blurriness or pixelation in your drop shadows can be a result of applying too much Gaussian blur or using a low pixel radius value. While it’s important to blur the shadow layer to create a gradual transition, excessive blurring can lead to a loss of detail. To rectify this issue, try reducing the Gaussian blur effect or increasing the pixel radius until you achieve a balance between smoothness and clarity.
3. Rough or Jagged Edges:
If your drop shadow has rough or jagged edges, it could be caused by low resolution or improper shadow settings. Ensure that your product photo is of high resolution to maintain the quality of the shadows. Additionally, take advantage of layer masks to manually refine the edges and create smoother transitions. By using the brush tool and softening the mask edges, you can achieve a more professional and polished look.
4. Inconsistent Shadow Color:
In some cases, you may encounter inconsistencies in the color of your drop shadows. This can happen when the background layer or underlying layers influence the shadow’s hue. To fix this, make sure that your drop shadow layer has a separate layer mask and is not affected by the background layer. Adjust the color balance or use adjustment layers to match the shadow color with the overall tone of your product photo.
Step-by-Step Tutorial: Creating Drop Shadows in Photoshop
Adding a drop shadow to your product photos in Photoshop can significantly enhance their visual appeal and make them stand out. In this step-by-step tutorial, we will guide you through the process of creating realistic drop shadows for your product images. Follow these instructions to achieve professional-looking results.
Step 1: Prepare your image
Open Adobe Photoshop and import your product photo.
Ensure that the image has a white background by using the Background Eraser or any other suitable tool.
Save a copy of your image in case you need to make any adjustments later on.
Step 2: Access the layers panel
In the Layers panel, you will see your background layer and the product photo layer. Make sure the product photo layer is selected.
Step 3: Create a new layer for the shadow
To add a drop shadow, create a new layer by clicking on “Layer” in the main menu, then selecting “New” followed by “Layer.”
Step 4: Access the Layer Style dialog box
Double-click on the new layer to access the Layer Style dialog box.
Alternatively, you can click on “Layer” in the main menu, hover over “Layer Style,” and select “Drop Shadow” from the drop-down menu.
Step 5: Adjust the drop shadow settings
In the Layer Style dialog box, you will find various options to customize your drop shadow.
Play around with the settings such as angle, distance, and size to achieve the desired effect.
You can also experiment with the blend mode to create different shadow styles.
Step 6: Fine-tune the shadow appearance
Use the Opacity slider to control the transparency of the drop shadow.
To soften the edges of the shadow, apply a Gaussian Blur filter by going to Filter > Blur > Gaussian Blur. Adjust the pixel radius until you achieve a natural-looking shadow.
Step 7: Apply a layer mask if needed
If you want to remove parts of the shadow that overlap with your product, create a layer mask by clicking on the layer mask icon at the bottom of the Layers panel.
Use the Brush tool with a black color to paint over the areas you want to erase. This will reveal the original product image.
Step 8: Refine the shadow placement
Use the Move tool to adjust the position of the shadow layer until it aligns properly with the light source of your product image
Conclusion: Achieve Professional Product Photos with Drop Shadows
In conclusion, adding drop shadows to your product photos in Photoshop is a simple yet powerful technique that can elevate your images to a more professional level. By following the steps outlined in this guide, you can achieve realistic shadows that give your products a sense of depth and dimension. Let’s recap the key takeaways:
1. Experiment with different blend modes and opacity settings to achieve the desired effect. The “Multiply” blend mode is commonly used for drop shadows, but feel free to explore other options as well.
2. Use the Layers panel to organize your shadow layers. Keeping them separate from the background layer allows for easier adjustments and flexibility.
3. Utilize the Transform tool to make precise adjustments to the size, position, and angle of your drop shadows. This ensures they align with the light source in your product photo for a natural look.
4. Adjust the shadow settings in the Layer Style dialog box to fine-tune the appearance of your drop shadows. Play around with the distance, spread, size, and opacity settings to achieve the desired effect.
5. Consider adding a layer mask to your shadow layer for more control over the shadow’s visibility and blending. This allows you to selectively hide or reveal areas of the shadow for seamless integration with the product image.
6. Don’t forget to create a new layer for each drop shadow you add. This ensures that you can easily modify or remove individual shadows without affecting the rest of your image.
7. Remember to save your file in a high-resolution format suitable for printing or online use. This ensures that the details of your product photo, including the drop shadows, are preserved.
For a more visual guide, consider watching video tutorials (keyword: video tutorial) that demonstrate the process of adding drop shadows in Photoshop. There are ample resources available online that provide step-by-step instructions and additional tips and tricks to enhance your product photography.
Conclusion
In conclusion, adding drop shadows to your product photos can greatly enhance their visual appeal and make them stand out from the competition. With the help of Photoshop, even beginners can master this technique and create amazing images that will catch the attention of your target audience. By following the step-by-step guide outlined in this blog, you can easily create professional-looking drop shadows that will give your product photos depth and dimension. The use of drop shadows can create a sense of realism, making your products appear more tangible and enticing to potential customers. Remember, consistency is key when it comes to product photography. Developing a consistent style for your drop shadows will help maintain a cohesive and professional look throughout your product catalog or website. So, whether you’re an e-commerce store
FAQ
Why are my drop shadows blurry?
One common issue that can occur when applying drop shadows with Photoshop is that they can be blurry due to the way shadows are rendered. This can be caused by a number of factors, but the biggest culprit is usually a low-resolution image.
What is a Drop Shadow?
A Drop Shadow is a type of shadow that is created by placing an object lower in the depth of field than the main subject. This creates the illusion that the shadow is falling off of the object.
How do I adjust the drop shadow’s opacity and gradient?
To adjust the opacity and gradient of the drop shadow, first select the layer you want to adjust, and then use the Opacity slider to adjust the transparency of the shadow. You can also use the Gradient slider to adjust the angle, intensity, and colors of the shadow.
How do I use the alpha channel and filters?
To add a drop shadow to an object, start by selecting the object you want to add the shadow to. Then, open the Filter Gallery and select Drop Shadow.
How do I add a Drop Shadow to my photo?
To add a Drop Shadow to a photo in Photoshop, follow these steps: Open the photo you want to shadow. With the photo open in Photoshop, select the Layers panel. Select the Shadow Layer. In the Shadow Options bar, type a value in the Drop Shadow Distance field (px). Type a value in the Drop Shadow Blur field (px). Click OK.
How do I save my product photo with a drop shadow?
To save your product photo with a drop shadow, follow these steps: Open the product photo you want to save with a drop shadow. Select the layer you want to apply the drop shadow to. In the Layer Style dialog box, click the Drop Shadow button. In the Drop Shadow Options dialog box, select the Layer Styles option. In the Layer Style dialog box, click the Add Layer Style button. In the Layer Style dialog box, select the Drop Shadow category. In the Drop Shadow Options dialog box, select the Shadow Color option. In the Shadow Options dialog box, select the Drop Shadow Radius option. 9.
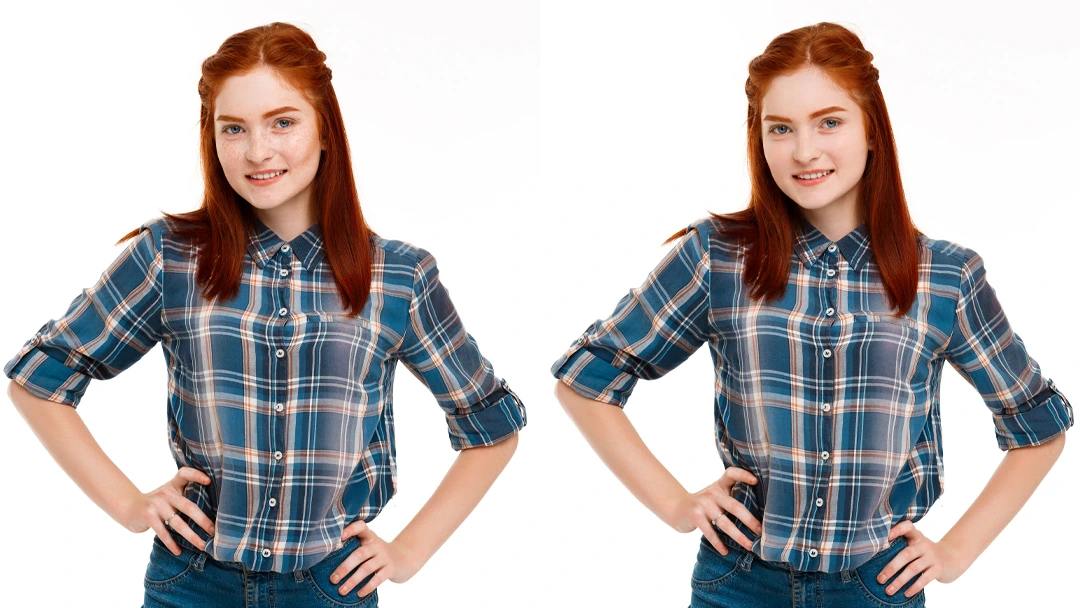
Are you tired of browsing through stunning product photos online, wondering how they achieved that perfect drop shadow effect? Picture this: You stumble upon an e-commerce website with a sleek, jaw-dropping image of a product that instantly captivates your attention. The item looks so vibrant and three-dimensional, it practically jumps off the screen. Wouldn’t you love to be able to create that kind of visual impact for your own products?
Well, fret no more! In this beginner’s guide, we will delve into the fascinating world of drop shadows in Photoshop, and show you exactly how to add those alluring shadows to your product photos. Say goodbye to flat, lifeless images and hello to captivating visuals that evoke desire and emotions within your customers.
Throughout this blog post, we’ll discuss the various techniques and settings you need to master, to ensure that you can effortlessly create amazing product photos with drop shadows. So let’s dive in and transform your product images from ordinary to extraordinary. It’s time to let your products shine with captivating shadows that leave a lasting impact.